Once more Adobe couldn’t leave well enough alone (thankfully), and they’ve taken the brand new 2012 processing engine that powers the new Lightroom 4 and incorporated it into our beloved Adobe Camera Raw (ACR). This technological leap not only extends the capabilities of this invaluable image processing engine, but also dramatically increases the potential quality of the final results. Even though the way you work in the new ACR is significantly different in terms of how the sliders work in its foundational Basic panel, once you get used to it, you’ll find that it is completely indispensable for getting more than you ever thought possible out of your photographs!
Adobe achieved this quantum leap, especially as it relates to pulling out every drop of tonal detail in your image, by completely rewriting their raw “demosaicing” engine, just as they did in 2010. And fortunately, as in the past, ACR also processes JPEG’s and TIF’s beautifully. What you will be able to pull out in terms of tone, color and detail is going to astound you, but to access this new power you’re going to have to re-learn some of the ways you may have optimized your images in ACR in the past. And if you are new to working in ACR you’ll actually find version 7 is actually a lot more intuitive than previous versions. Let’s take a look at some of those differences.
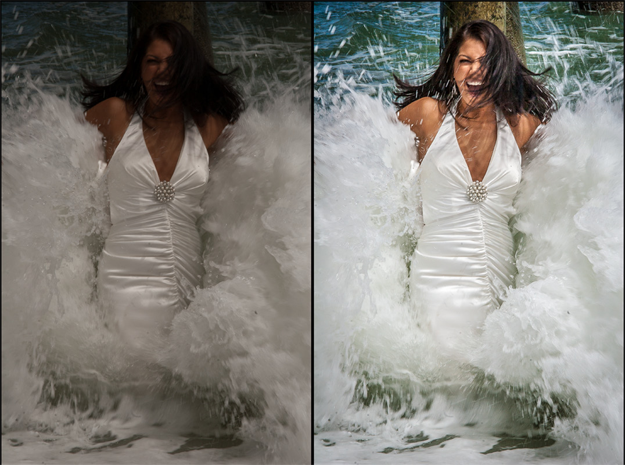
Before and Afters of the power of the new Basic Panel’s possibilities. NO targeted dodging & burning was needed! ©BrookeChristl.com
Even though ACR 6 (the previous version) was incredibly powerful, the way the Basic panel (where the majority of your image enhancing takes place) was organized did not lead to the most intuitive way of working. Looking here on the far left are the default sliders and settings for ACR 6. The sliders already had default settings applied, and whether a slider lightened or darkened your image when moving it depended on the specific slider. And which portion of the tonal range was being adjusted by which slider (and how far the sliders could be “pushed” before artifacts were introduced) was a quandary for many.
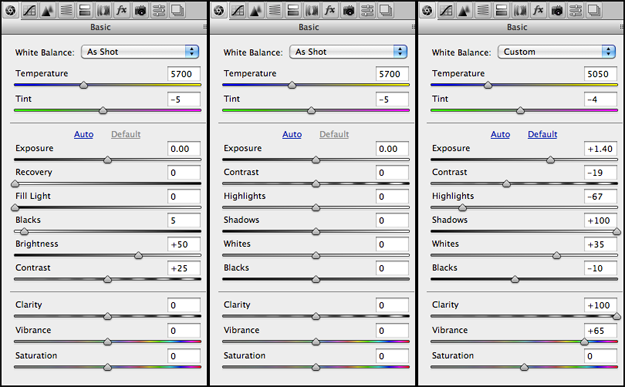
ACR 6’s default sliders and settings. The new ACR 7’s options and VERY intuitive default 0’s. And the final settings for Brooke’s Trash The Dress photo above.
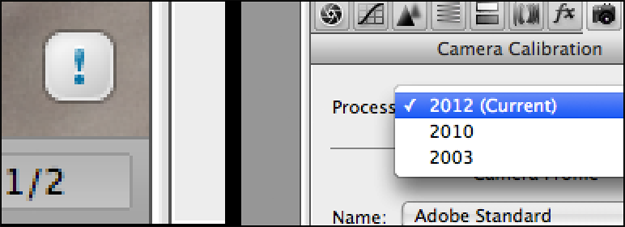
If you open an image in the new ACR 7 that you have previously worked on in an older version, you will find a little “exclamation” icon in the lower right-hand corner of the main image window that’s warning you that it’s using an older version of the processing engine (as mentioned, the last version was created in 2010). When this icon is visible you’ll notice that all the sliders within the Basic panel are the same as they were in ACR 6, and their order and how they work will be the same. As an aside, this is actually a feature, because if you have a particular effect that you liked to produce in previous versions of Adobe Camera Raw, you can still work that way even though those older sliders are technically no longer part of the ACR 7 processing engine. Additionally, if you use Presets that are based upon these older sliders, you can still use them as well because 7.0 allows for the older processing engine to co-exist within the software. That being said, you’re probably going to be updating and fine-tuning a lot of your favorite presets to take advantage of the new capabilities of the 2012 processor. Once you click on the Exclamation icon (it’s actually a button), or go over to the Camera Calibration tab and select the 2012 process, you’ll find that all the Basic sliders now default to zero smack dab in the middle of the slider bar, and all of them now work exactly the same way – meaning moving a slider to the left will always darken your image, moving it to the right will always lighten your image. But the magic behind each one of the sliders has actually changed significantly.
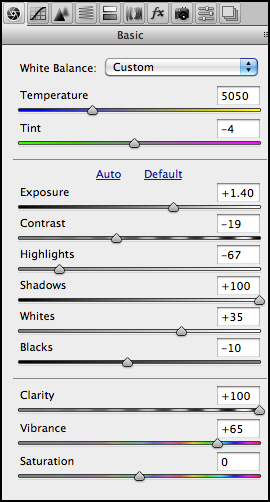
Let’s discuss what each slider in 7.0 does now.
Exposure used to be much more of a highlight or white point slider within previous versions of ACR and could blow out or muddy-up your highlights if you weren’t careful. Now, Exposure is what you might typically think it is: it’s affecting the basic middle-tone brightness of your image, thus you can use it as the starting point for the manipulation of your images. You no longer need to worry if the highlights or shadows in your images seem compromised, they are still there and are happily waiting for your touch in the sliders below!
In previous versions of ACR, you also had to be careful of the Contrast slider because of the possibility of clipping information in the shadows and highlights in your image. Contrast still primarily manipulates the middle-tones in a photograph, but you will find that it’s more forgiving than in the past, especially in the transition areas between the mid-tones and the highlights and shadows. But even with that forgiveness, for many images I recommend that you wait until later in your workflow process to adjust Contrast. In other words, use it once you’ve fine-tuned all your other options toadd that extra little bit of punch or to soften harsh tones.
You may suspect that the new Highlights and Shadows sliders are the same as the old Recovery and Fill Light sliders in the previous ACR, but nothing could be further from the truth. First, the Highlights and Shadow sliders are incredibly powerful in terms of what they’re able to resuscitate in an image! The tonal range, even in a single image, can now often be beautifully extended to produce what used to require three or more separate images to create in an HDR (High Dynamic Range) composite (a god-send in once-in-a-lifetime action situations such as Brooke Christl’s Trash the Dress image)! Second, you’ll also notice that because the sliders now begin in the center of the bar, not only can you bring back or darken Highlight detail, but you may also safely increase the neighboring Whites for punch as well! Same goes for working with the Shadows slider: you can brighten up a lot of information in the shadows but you can also take this three-quarter portion of the total range and bring it down, without plugging up your blacks, which is exciting! The Blacks and Whites sliders also operate on these same principals. In earlier ACR versions, even though you had a Black slider, you were only able to darken your darkest darks, you could never lighten the amount of base blacks like you can do now with ACR 7.
To over-simplify these controls, these six sliders can be thought of as neighboring pairs: Exposure and Contrast control your middle-tone areas. Highlights and Shadows control your three-quarter and quarter tones. The Whites and Blacks sliders fine-tune the furthest extremes of your photograph’s range. If you think of these as three associated adjustments pairs, I think you’ll find it easier to wrap your head around the new sliders.
But wait… there’s more…
Even though the Clarity slider has the same name as in previous versions of ACR, it has been completely rewritten and now does a significantly better job of increasing apparent detail in an image without bringing in the “haloing” artifacts possible in previous versions. But because this edge contrast can be so significant, you might be lulled into a false sense of security and actually add too much contrast to these edges. Even though you won’t get the halos as you once did, you can still potentially plug up edge detail in certain images. So remember to zoom in and check your image when using excessive Clarity, you may find yourself adding a little bit more Shadow brightness, or a reduction in Contrast to compensate.
You can see in Brooke’s wedding dress shot that she significantly underexposed the image (wouldn’t you underexpose it if you only had ONE chance of getting THE shot of a bright shiny wedding dress and it’s inhabitant as they were about to meet Poseidon? ;). But even with this seeming lack of detail you will notice I was able to bring up the Exposure for the overall brightness of the image, then bring back in significant Highlight detail into the dress, once I had set the correct exposure. I was also able to pull out a huge amount of Shadow detail, taking it all the way up to 100% , without artifacts! I actually took the Whites UP in this file to add that satin sheen, yet maintain the Highlight detail! This is an amazing ability to fine-tune the entire tonal range of an image without the necessity of hand dodging & burning (we’ll get to Localized adjustments in a minute). Also, to bring in all the details in the water and dress the Clarity was set all the way up to 100%, without any artifact creation whatsoever, which would have been impossible in previous versions of ACR.
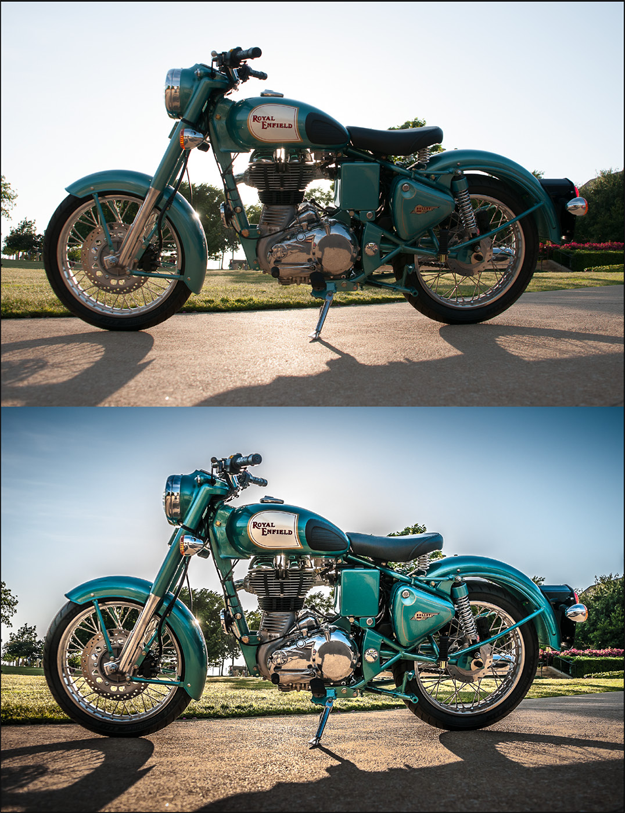
Still not convinced? You say you could make shadows lighter and highlights darker in previous versions of ACR so what’s the big deal? The big deal is QUALITY! Take a look at this quick shot I took of a vintage motorcycle.
©Jack H. Davis / WowCreativeArts.com
In previous versions of ACR if you were to significantly darken the highlight information and bring up the shadow detail you could get significant artifacting at that transition between highlights and shadows, as in the fringing of the trees around the motorcycle seat. In the current ACR 7, there is no such artifacting and the detail throughout the image is crisper and cleaner than I would have ever imagined from a single shot!

A single shot “HDR”? Yup! And with the taming of the edge artifacts that used to happen where highlights and shadows collide, there is finally peace in the previously Dramatic Range!
Actually, this image is something I’ve used in the past to teach how to combine five bracketed shots together to create one HDR image. Using ACR 7 you can definitely pull off exposures that could have only been achieved with multi-shot High Dynamic Range combinations in the past – talk about a time-saver!
If you were making a wish list for the Adobe Tooth Fairy (Russell Brown, are you listening?), and you had all these phenomenal capabilities added to the Basic panel, what would be the one additional characteristic that would make your creative darkroom dreams complete? Of course, you would want those capabilities added to ACR’s targeted Adjustment Brush and Graduated Filter! And that’s exactly what Adobe has done with the improvements in ACR 7, and more!
Not only have they added our new best friends of Shadows, Highlight and Clarity, they have also given us something that we’ve never had before: the ability to adjust localized color temperature using a brush or gradient! Even though you could do something similar to this before by adding the opposite color cast using the little color swatch in the Graduated Filter and Adjustment Brush panels, it’s not the same as actually using a temperature and tint slider to fine-tune and balance different color casts within an image. In this second Brooke Crystal wedding image we have a very warm interior artificial light balanced out with the cooler external sunlight by simply dragging out a Gradient Filter slider from the left to the right, with a tap toward the blue of the Temperature slider. And because Shadow resuscitation can now be put inside a brush or gradient as well, Adobe has also graciously added Noise Reduction to their localized adjustment tools, an incredibly useful feature when pulling out shadow detail that don’t want to come willingly!
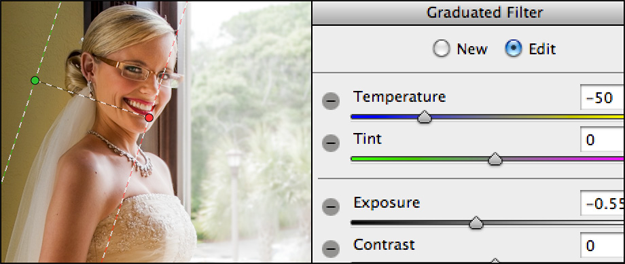
A little cool temperature Graduated Filter balances out a challenging lighting situation in a snap! ©BrookeChristl.com
Curves, one of the basic adjustments in Photoshop for the last hundred years, has been available in ACR for a while, with both Point Curves as well as the powerful Parametric Curves. But prior to ACR 7, we were unable to access the foundational Red, Green and Blue channels independently, but now you can. The benefit is that for the first time you can use separate Red, Green and Blue curves to fine-tune color casts and tonal information, but you can also use them for an immeasurable amount of special-effects enhancing to an image. Before ACR 7.0, this was really only possible in Photoshop. In this shot by Hal and Victoria Schmitt of LightWorkshops.com, we’re able to not only improve the tonal range of this portrait but also add a Cross Processing effect by shaping the total range of each one of the Red, Green and Blue channels independently of each other, allowing for a beautifully expressive enhancement, with absolute quality and control.
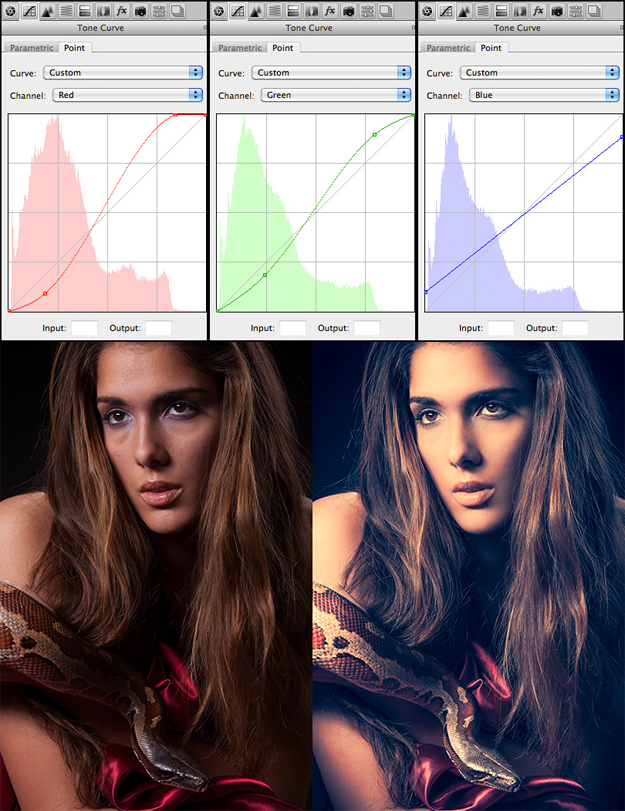
©Hal and Victoria Schmitt /LightWorkshops.com
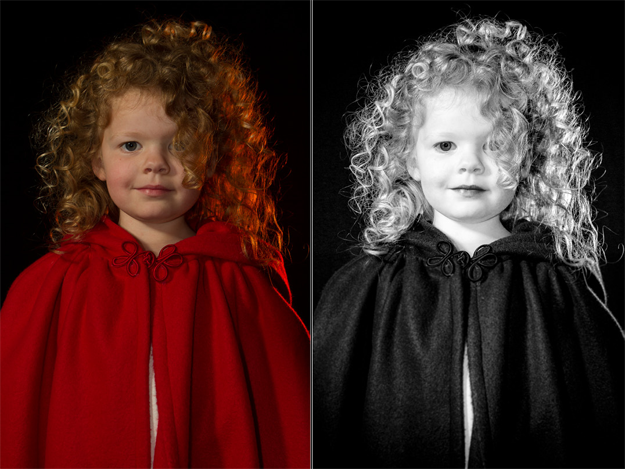
Another long-time use for curves has been for converting images to black-and-white, one of the advanced features in Photoshop we’ve used for ages. Now with the combination of targeted Curves and the already phenomenal Hue, Saturation and Luminance panel, we have the ability to further fine tune black-and-white images in ways never before possible, such as in this portrait of this beautiful little girl also by Hal and Victoria Schmitt. Red hair goes white, red cloak goes black – with no dodging and burnng – figure THAT one out! 😉
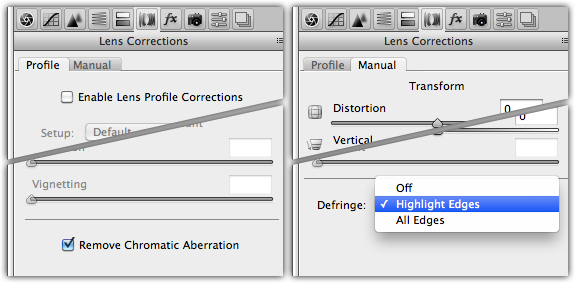
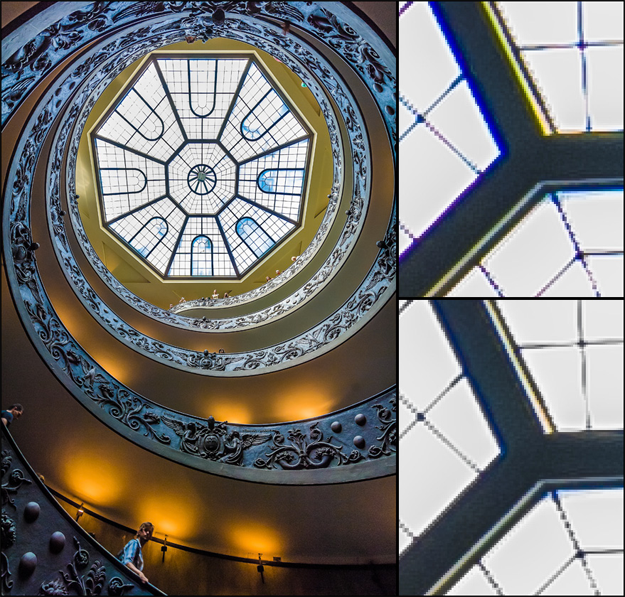
Chromatic Aberrations are the annoying colorful edge artifacts seen in contrasting highlights left by the minor misalignment of different color channels in images taken with certain wide-angle lens (see the museum skylight shot). Chromatic Aberration removal was built into ACR before, but needed a special profile for the specific lens to do the job well. What the mad scientists at Adobe figured out was that they were able to do a better job of removing these edge color artifacts using their own algorithms rather than relying on the profiles. Specifically, using the Remove Chromatic Aberration option (within the Profile tab within the Lens Correction panel) in concert with the Defringe > Highlight Edges option (within the Manual tab of the same Lens Correction panel) allows you to virtually get rid of any sort of edge artifacting that you could possibly come across, all with a couple little clicks!
So there is a quick overview of just some of the improvements in the new Adobe Camera Raw 7. Now all the jaw-dropping and deadline-saving projects that you can DO with all that power, well, that would take an entire DVD to demonstrate (yes, that’s a shameless plug for my new Adobe Camera Raw 7 Enhancing and Lightroom 4 Enhancing titles from PhotoshopCafe.com and WowCreativeArts.com)!
Jack Davis
Jack Davis is one of the world’s leading experts on Photoshop and Lightroom, as well as himself being an award-winning photographer. Jack is coauthor of a dozen different creative titles including the bestselling (a million copies+ in 12 languages) guide to Photoshop, The Photoshop Wow! Book, and How to Wow: Photoshop for Photography. For over 20 years Jack has been an internationally renowned spokesperson on digital imagery, and routinely teaching at conferences and workshops around the world. Davis is part of the “Dream Team” at the Photoshop World Conferences and was one of the first inductees into the Photoshop Hall of Fame for his lifetime contributions to the industry. Jack has an MA and MFA in Digital Imagery, and when he’s not in his studio in San Diego, he’s usually somewhere in Polynesia, iPhone and Big Boy camera in hand, capturing the local color.
For more about Jack, his training material and teaching schedule (including his immanent Workflow Tour with SandyPucTours.com) go to WowCreativeArts.com.
With Photoshop CS6’s new ACR 7, Adobe has introduced tools that have the power to completely change the way we shape our photography. Instead of working one image at a time, one step at a time, now the vast majority of our photographic finishing can be done quickly, elegantly and nondestructively in one place! – without even opening Photoshop! This includes such universal tasks as dodging & burning, skin softening or even targeted white balancing and blurring! That’s what Adobe Camera Raw 7’s new processing engine and tools have brought with them to yield a dramatically streamlined workflow. You will have to see all these life-saving techniques in action to understand just how powerful they are, and how much easier they are gonna make you work! If you’re a Lightroom user Jack hasn’t left you out; there is a Lightroom 4 Enhancing title available from Jack soon as well. Also look for Jack’s Expressive Painting in Photoshop CS5/CS6 and Photoshop
All the CS6 information and more is available as a PDF magazine called the CS6 Superguide. If you’re on our list, you will receive it free by email as soon as it’s available. If not, sign up now and get the CS6 Superguide for free.
[mc4wp_form id=”4721″]

This site uses Akismet to reduce spam. Learn how your comment data is processed.
Match color and tone on background with Harmonize in Photoshop 2022...
Photoshop CC 2017 has a search tool, templates, updated face aware liquify, refined select and mask, a new, new...
Photoshop CS4 and 3D Stephen Burns – www.chromeallusion.com Adobe is bridging the gap between two dimensional and 3 dimensional approaches to...

Leave a Reply